Unconventional typing: part 2
Building and living with a DIY ergonomic split keyboard.
Table of Contents:
A splitting decision
On my last post I left of with a banger software based typing setup. I got my Colemak-dh, my homerow mods (which I extensively praised) and my layers all neatly integrated into my workflow, it was great! However, lingering around was still an unease, a general feeling of disquiet. And this feeling was one I could quite literally get my hands on. My issue wasn’t with the way I typed, you see, it was but with the keyboard itself! It bothered me: there was still further optimization to be done.
Allow me to explain. What if I told you’ve been lied to? What if I told you the standard keyboard shape, i.e. the way the keys are positioned, is not really designed with ergonomics in mind? Ever wondered why the keys don’t align with each other into a neat little grid? Ever considered the possibility that the strongest and most agile finger, the thumb, could be used to hit more that the space bar?
Piqued your interest? Let me introduce you to the world of split ergonomic keyboards.
POV: you're filming yourself typing (that's what you do for fun)
Down another rabbit hole yet again.
Choosing the right keyboard
With all that said, there are pretty valid concerns with the way standard keyboards are designed, how it affects your typing posture and how it can spiral into other health issues. I’m not an expert, and as such I’m not gonna delve too much into them. To be completely honest, I just wanted a chance to play around with electronics and build a really cool custom mechanical keyboard. In this post I hope to share some of what I learned building my own.
I like to think of keyboards as being categorized along 4 axis:
- Split / Non Split
- Row Staggered / Column Staggered / Ortholinear layout
- Number of keys
- Flat / Tenting / Weird Madness
Here’s a collection of popular keyboards I looked into while doing my research, complete with their respective distribution among the categories.
| Keyboard | Split / Non Split | Layout Type | Number of Keys | Form Factor | Open Source Hardware |
|---|---|---|---|---|---|
| Standard 104-Key | Non-Split | Row Staggered | 104 | Flat | (not aplicable) |
| Kinesis Advantage2 | Split* | Column Staggered | ~76 | Sculpted / Tented | ❌ |
| Glove80 | Split | Column Staggered | 80 | Sculpted / Tented | ❌ |
| ErgoDox EZ | Split | Column Staggered | 76 | Tenting / Adjustable | ❌ |
| Moonlander | Split | Column Staggered | 78 | Tenting / Adjustable | ❌ |
| Lily58 | Split | Column Staggered | ~58 | Flat / Tenting (kit) | ✅ |
| Corne (CRKBD) | Split | Column Staggered | 42 | Flat / Tenting (kit) | ✅ |
| Dactyl Manuform | Split | Column Staggered | 50–70 (varies) | Sculpted / “Madness” | ✅ |
In the end, I went with the Lily58 . I felt like it was a fairly conservative choice at the time and that proved to be right. It was split and column staggered, the main things I wanted to try, while maintaining a sane number of keys, which allowed me to keep the number row. Further, since the design was open hardware, that gave me the chance to source my own parts and assemble it all by myself, which would make it a significantly cheaper than the pre-built options (I was not about to drop 300€ on a keyboard I didn’t even know I’d like).
Ordering parts
When choosing the parts for your keyboard, the main components you need to worry about are:
PCB’s
This ultimately comes down to choosing (or designing) the keyboard, as discussed on the last section. Some things to look for are switch compatibility and hot-swap compatibility. Optionally, you might also want a board with support for LEDs, OLED display or encoders.
Microcontrollers
The microcontroller is what, well, controls the whole keyboard. It detects the keypresses and sends the information to the computer via USB. The most common form factor for these is the pro-micro
and there are a ton of compatible clones out there! Some come with more powerful chips, like the rp2040
instead of the classic ATmega32U4
, so that’s something to look out for if you want a fancy animated display. If you want Bluetooth keyboard, you’ll want something like a nice!nano
.
As for firmware, you got QMK
for wired and ZMK
for wireless setups. They are extensively customizable, with all the cool features like layers, tap-mod keys, key-combos, etc. And if that’s not enough you could always write your own firmware!
Swithes and keycaps
Alright, keyboard switches really are an entire world. They really come down to personal preference. I’d just double check that the switch type you choose is supported by the PCB. There are two main designs that came up during my research: MX style and Choc style. I ended up with Kailh Choc Pro-Reds and really like them.
Other components
| Component | Quantity | Optional |
|---|---|---|
| Diodes | 1 per key | No |
| Hot-swap sockets | 1 per key | Yes |
| TRS cable and sockets | 1 per keyboard | No |
| Reset buttons | 1 per microcontroller | No |
| Batteries | 1~2 per keyboard | Yes (if wireless) |
| LEDs | 1 per key (if RGB) | Yes |
| OLED displays | 1~2 per keyboard | Yes |
| Encoders | go wild with it | Yes |
Breaking down costs
Ok, now for the most important part, how much did this all cost? Let me break it down for you:
Disclaimer: the following links are in no way affiliate. I don’t get anything from sharing this, this is legit just what I bought. Also, some of the deals might not be in place anymore, so the pricing may vary (especially for AliExpress, I feel like the prices change every refresh).
| Source | Item | Qty | Price (€) |
|---|---|---|---|
| SplitKB | Aurora Lily58 PCB Kit (incl. PCBs, diodes, etc.) | 1 | 31,36 |
| SplitKB | Blank MBK Choc Keycaps (1.5u, black, 5 pcs) | 1 set | 3,68 |
| SplitKB Subtotal | 35,04 | ||
| Shipping | 11,04 | ||
| VAT (PT) | 10,60 | ||
| SplitKB Total | 56,68 | ||
| AliExpress | PBT Low Profile Keycaps (white, 50 pcs) | 1 set | 28,51 |
| AliExpress | Choc V1 Red Pro Switches (70 pcs) | 1 pack | 20,49 |
| AliExpress | Type-C Pro Micro Clone (5V 16MHz) | 2 | 9,62 |
| AliExpress | Low Profile Keycaps (black, 6 pcs each) | 2 sets | 6,82 |
| AliExpress | Coiled TRRS Audio Cable (1m, 4-pole) | 1 | 2,87 |
| AliExpress Total | 68,31 | ||
| Total | 124,99 |
Ok, so as you can see it was not cheap, unfortunately :(
I really played it safe by ordering the kit from SplitKB. Since it was my first build I really just wanted it to work, so paid a little more for the convenience of having the PCB’s and all the other small components (diodes, hot-swap sockets, resistors, jacks) in a nice package from a reputable source.
Also, holy shit are switches and keycaps ever expensive! Especially for the Choc style switches, the pricing really caught me off guard, even buying from AliExpress. The good thing is that I was smart enough to get hot-swaps instead of soldering the switches to the board, that way if I want to do another build in the future I can just use these existing switches and keycaps.
If I were to do it again, I’d definitely be a little less scared of sourcing all of the components individually. Perhaps even looking into getting the PCB’s from a PCB manufacturing service, since its an open design. Further, if budget was my key concern, I’d 3d print the keycaps. Doing this (and going with the more traditional MX style switches), the pricing could easily be cut in half.
All in all, I’d say I didn’t do that bad. I was conservative, yes, but also got a working keyboard with really solid parts (the low profile switches and PBT keycaps are really nice!) and still beat the price of a pre-assembled keyboard by some margin. When it comes down to it, I guess these things are just niche and expensive.

On Coping with Overspending on Electronics, digital, 2025, Jusé Lopz
Assembly
The assembly was a fairly straight forward process, no doubt thanks to the quality of the Lily58’s PCB design. Having access to HackerSchool ’s awesome soldering setup also helped, many thanks for letting me borrow it!
Soldering
The first step was soldering all the components onto the PCB. This includes the SMD diodes, the hot-swap sockets, the reset button and the TRS connector. I’ll talk about soldering the micro-controller on the next section, as it was a bit more… peculiar.
Since this was my first time soldering SMD components, I was a bit nervous going into it. As it turns out, it’s not complicated once you get the technique down, and after a couple of YouTube Tutorials I was blazing.
Here’s the steps:
- Pre-place a bit of solder on one of the pads
- Solder one end of the SMD diode
- Solder the other end of the diode
- Adjust first solder if necessary

How to solder an SMD Diode, a schematic.
The hardest part was for sure the sheer amount of components that needed soldering, particularly diodes and hot-swap sockets (1 per key), 58 in total! For me this part of the process was about 2~3 hours of manual labour, but I believe it could be done much faster by someone more experienced. I believe I could do it much faster now.

Lily58 - Midway through the soldering process
Low-profile socket shenanigans
The last component that needed soldering was the micro-controllers.
I wanted to avoid soldering them directly to the PCB in case I wanted to upgrade to a wireless setup in the future (I never did). I also wanted to use low-profile sockets for the cool looks. This last part turned out to be a problem, since I did not take into account that the included pin headers were the standard square ones and did not fit the sockets I had available.
Some hacking was in order.
As it turns out, I found that resistor legs made for the perfect fit on my low-profile sockets. I figured that I could take those legs and repurpose them as my headers (see picture below) (sorry for bad quality) (not sorry for what I did to those resistors).
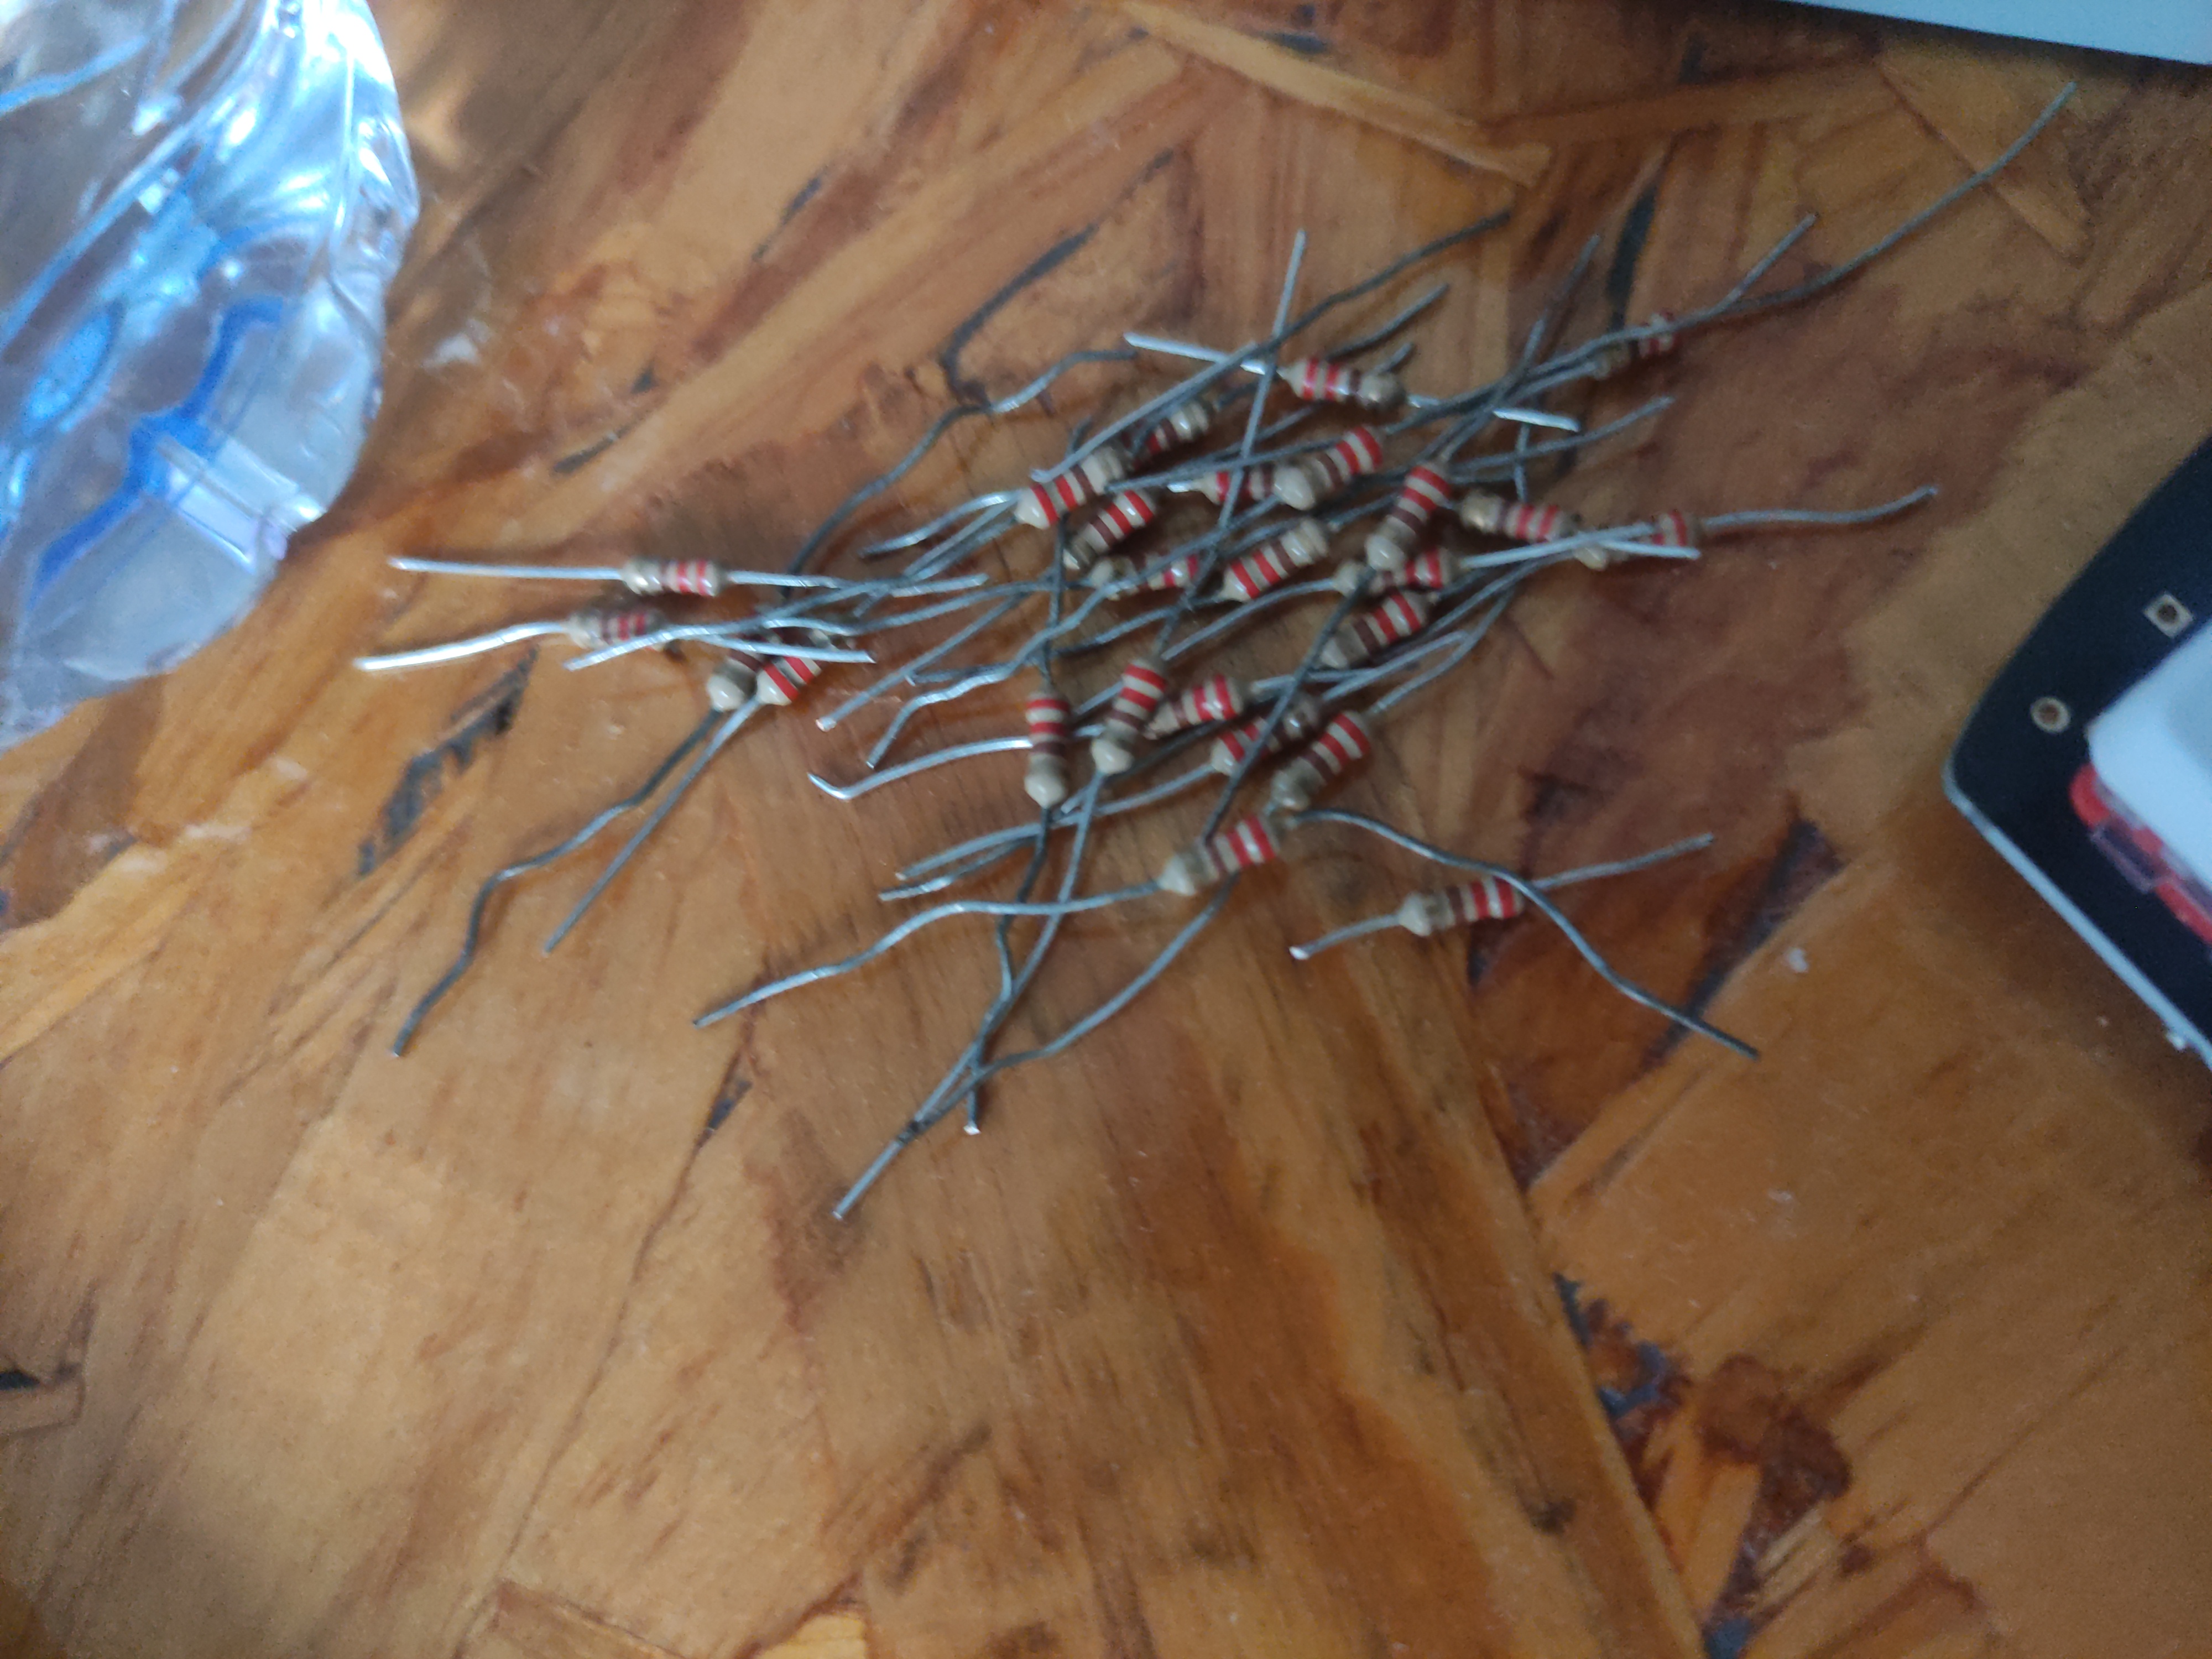
Lily58 - Hero resistors, their sacrifice shall not be forgotten
The process goes like this:
- Tape the sockets with electrical tape to avoid soldering the controller to the socket.
- Insert the resistor through the hole in the micro-controller until it is firmly lodged on the socket bellow.
- Solder resistor leg to micro-controller and cut the excess.
- Repeat until all pins are soldered.
The image below shows the donor legs already inserted and ready to be soldered.
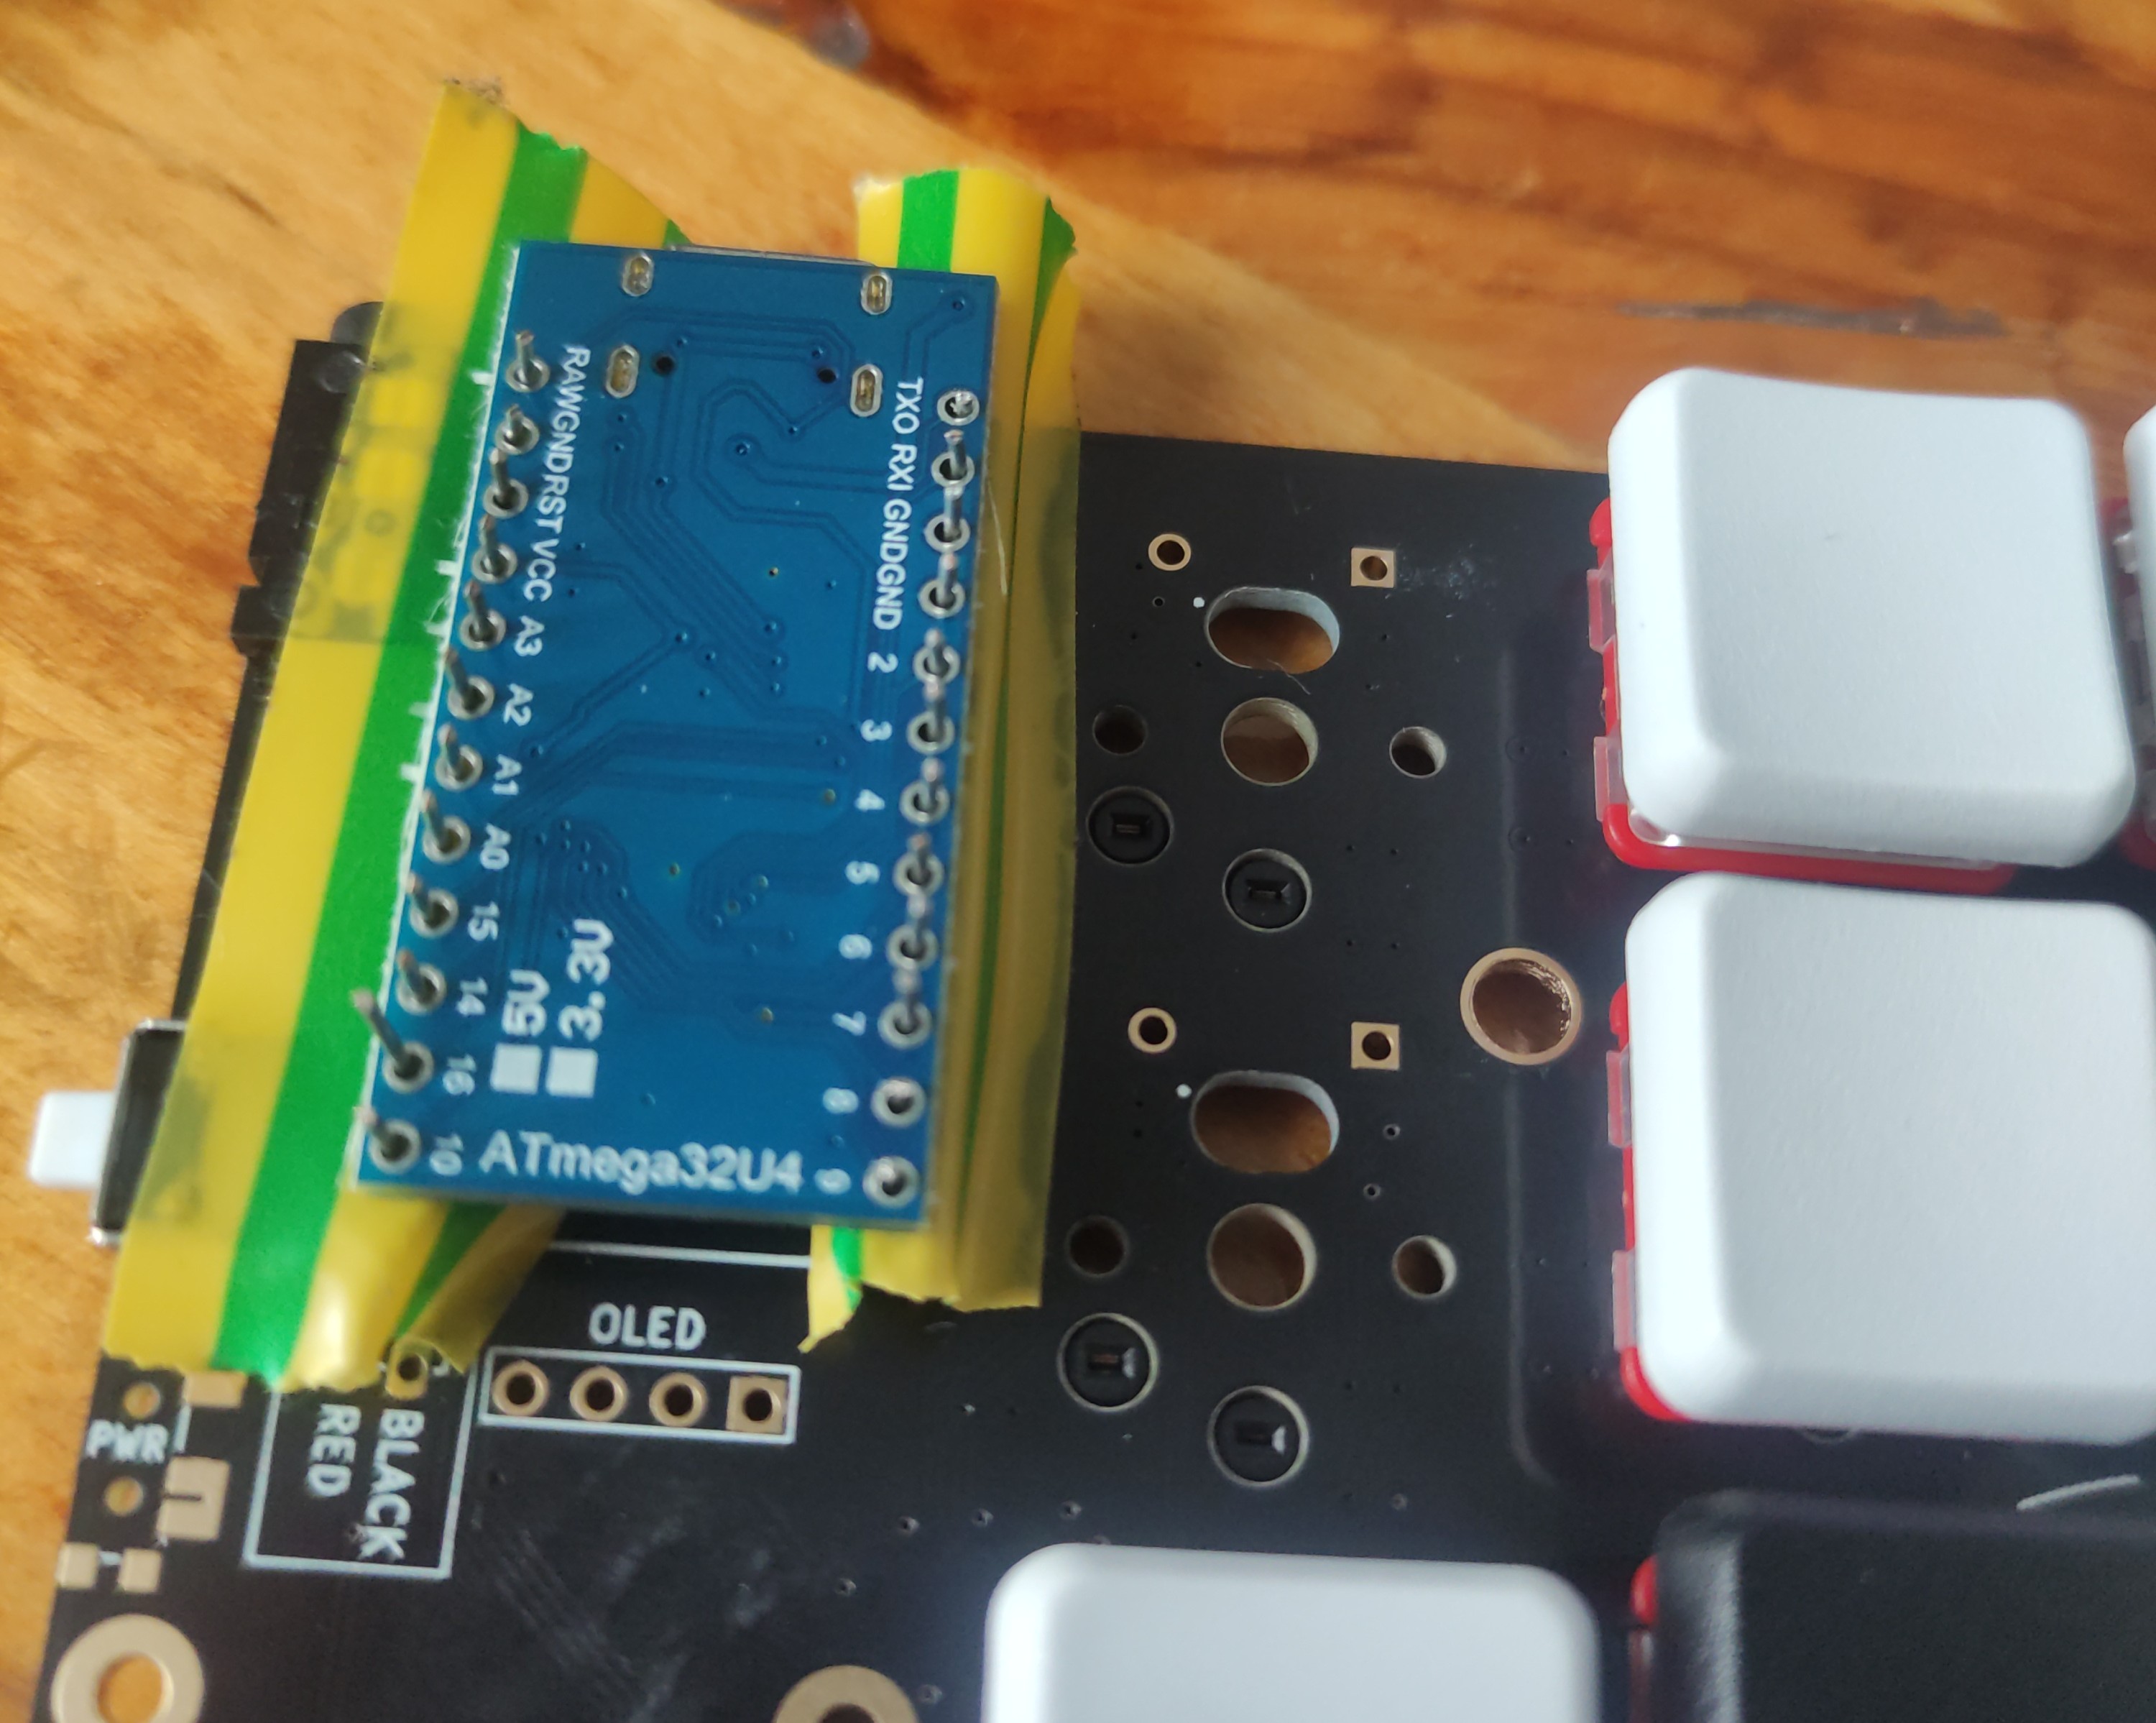
Lily58 - Scuffed soldering of the micro-controller with the forbidden Donor Resistor Leg Technique
And that’s it, all the soldering was done! All that was left was inserting all the keys and keycaps and the assembly was complete.
Uploading the Firmware
Finally, the last missing step to get a functional keyboard was to upload the QMK
firmware.
QMK
offers an amazing online configurator
that supports a lot of popular keyboards. After configuring, you download the JSON and compile and upload the firmware with the following command, assuming QMK
is installed:
qmk flash -bl avrdude config.json
After the compilation step there is a prompt to put the device in bootmode (double tap the reset button on the Lily58) and the firmware is uploaded.
The keyboard is now ready for use!
Finishing Touches
Well, not quite ready yet. As it was, it remained an exposed, wobbly board with keys. A key-board, indeed.
Tape mod
First, I used some painters tape on the backside of the PCB, my goal being to protect the components while simultaneously improving the clicking sound. I’ll let you, dear reader, be the judge of that:
Clicking sound comparison: regular (left) vs tape mod (right)
3D Printed Case
Since pre-made cases available to purchase were too expensive I went with 3D printing! Plus, it was a good excuse to put my good ol’ Anet-A8 to use.
I looked through printables and found this case model I really liked made by Gabbajoe , and modified the back cover a tiny bit by adding supporting holes where I could mount tenting screws. Here’s the STL file .
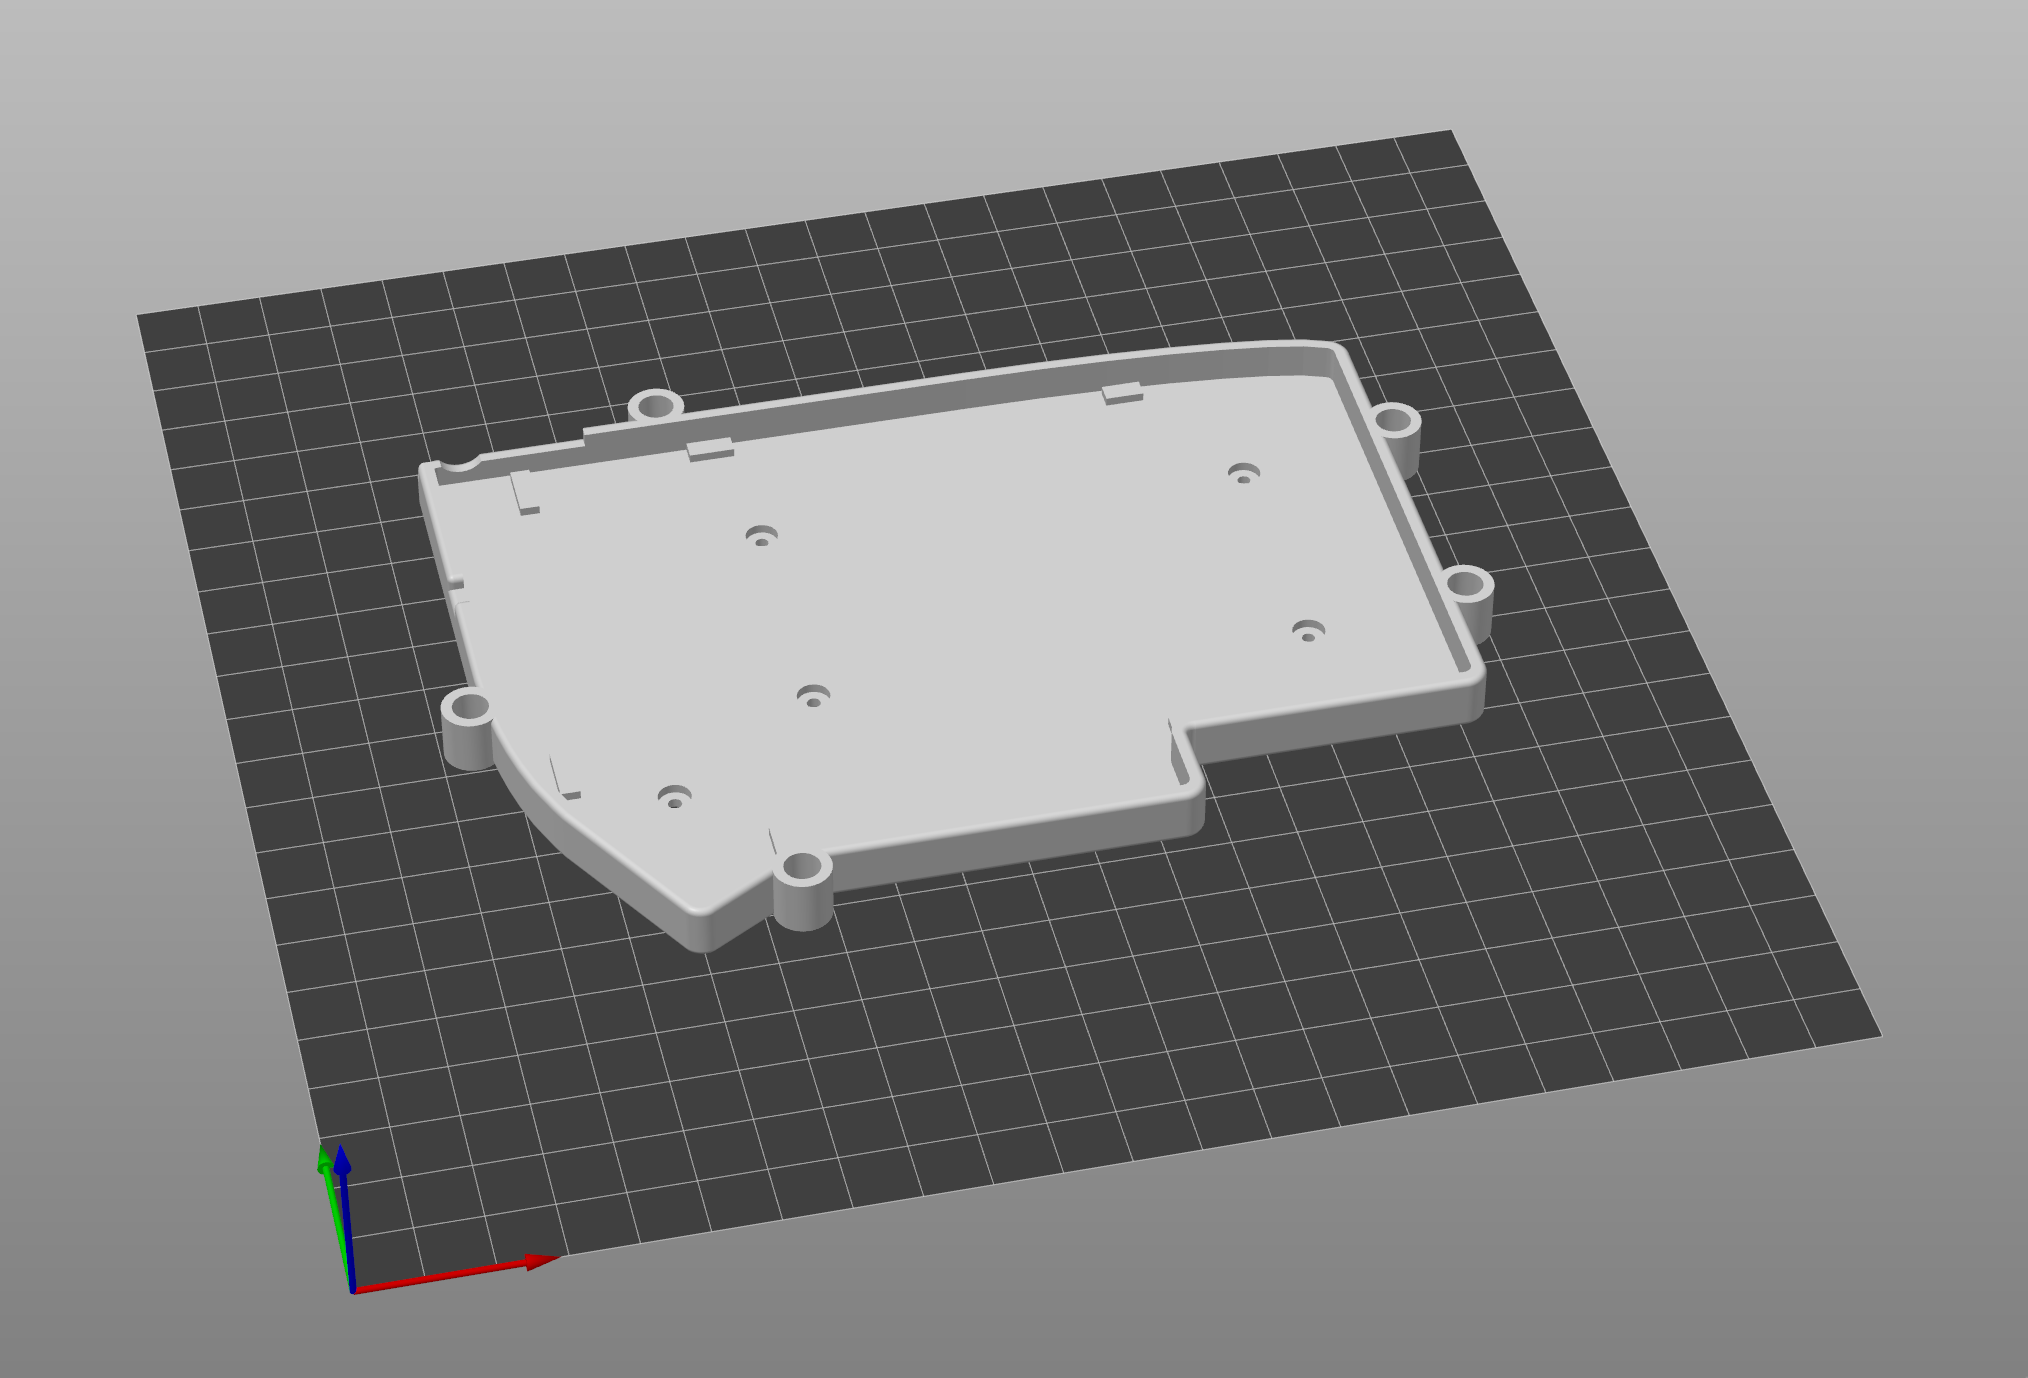
Lily58 - Modified back case with tenting holes.
I chose to print in clear PETG because I wanted something more durable and more flexible than PLA, allowing me to bend it a little bit on the account of potential sizing issues. Luckily, it was also the only filament I had laying around.
After printing all the parts, I assembled the switches onto the front plate and pressure fitted the back cover.
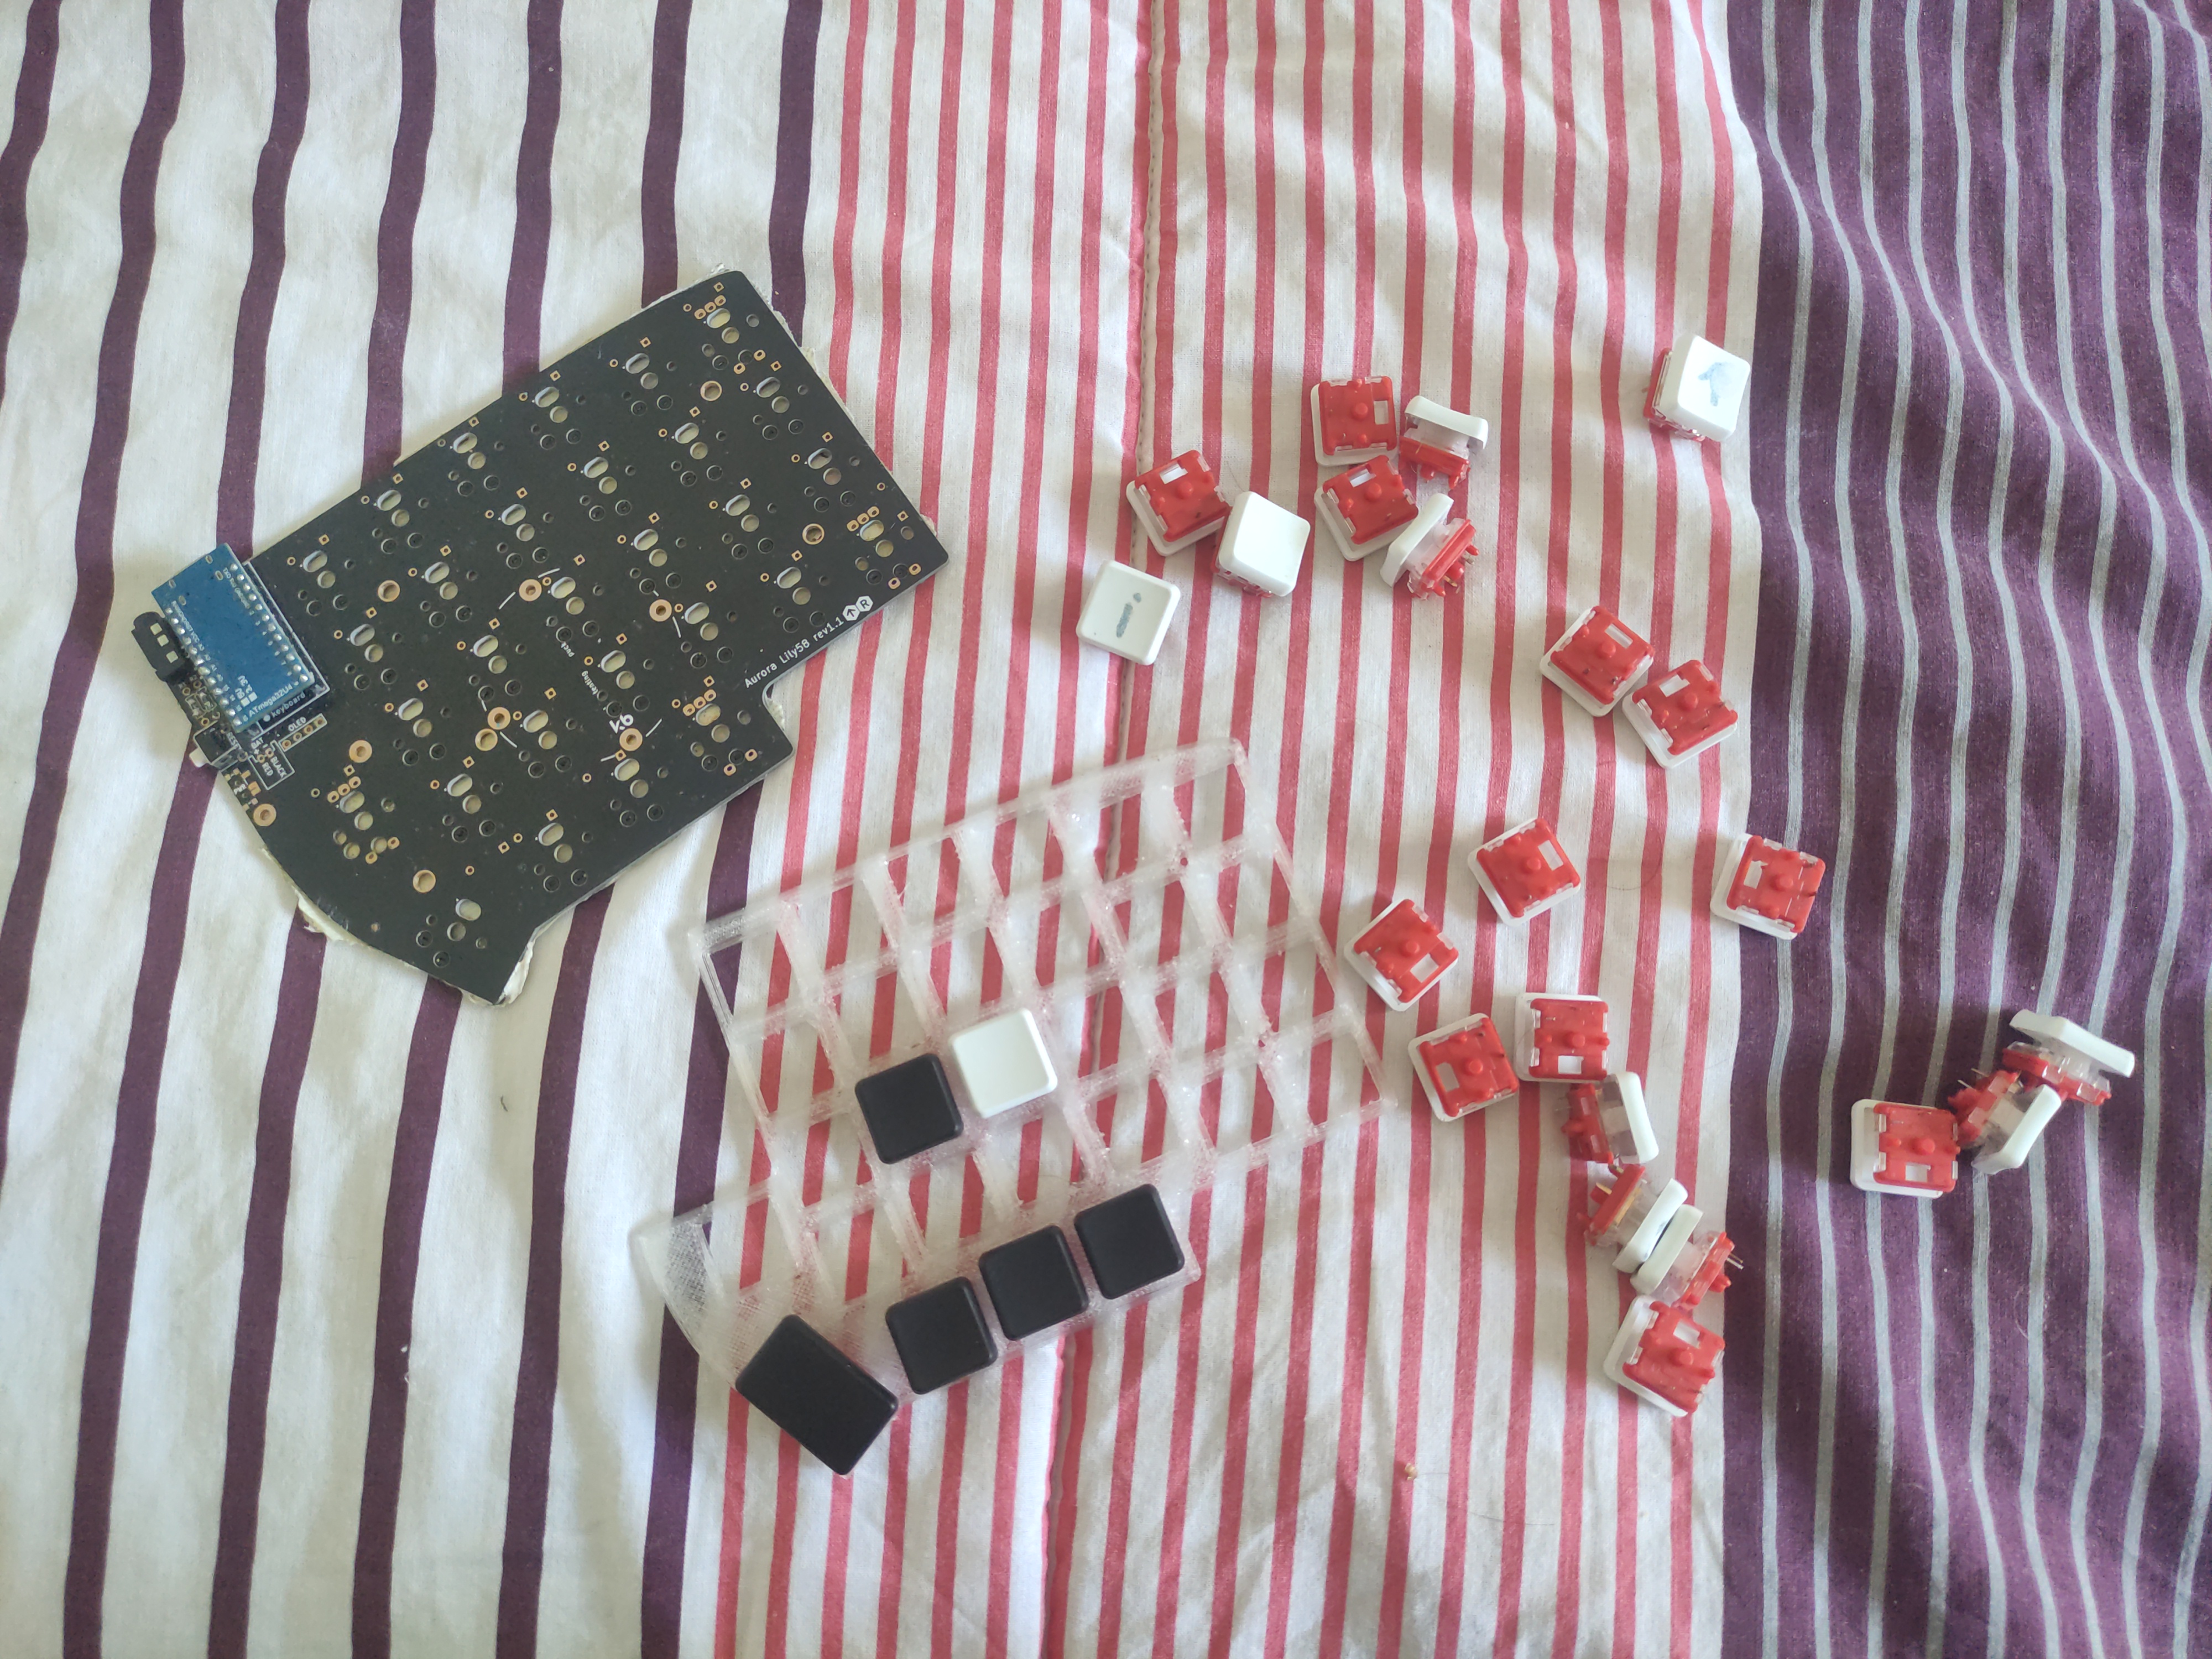
Lily58 - Mounting switches onto front cover.
I truly had low expectations but the case really came out amazing! It provides a lot of protection to the PCB and the front cover in particular securely keeps the switches in place, fixing the wobbling. Plus, the tenting makes such a huge difference when typing, definitely more ergonomic experience for my hands.
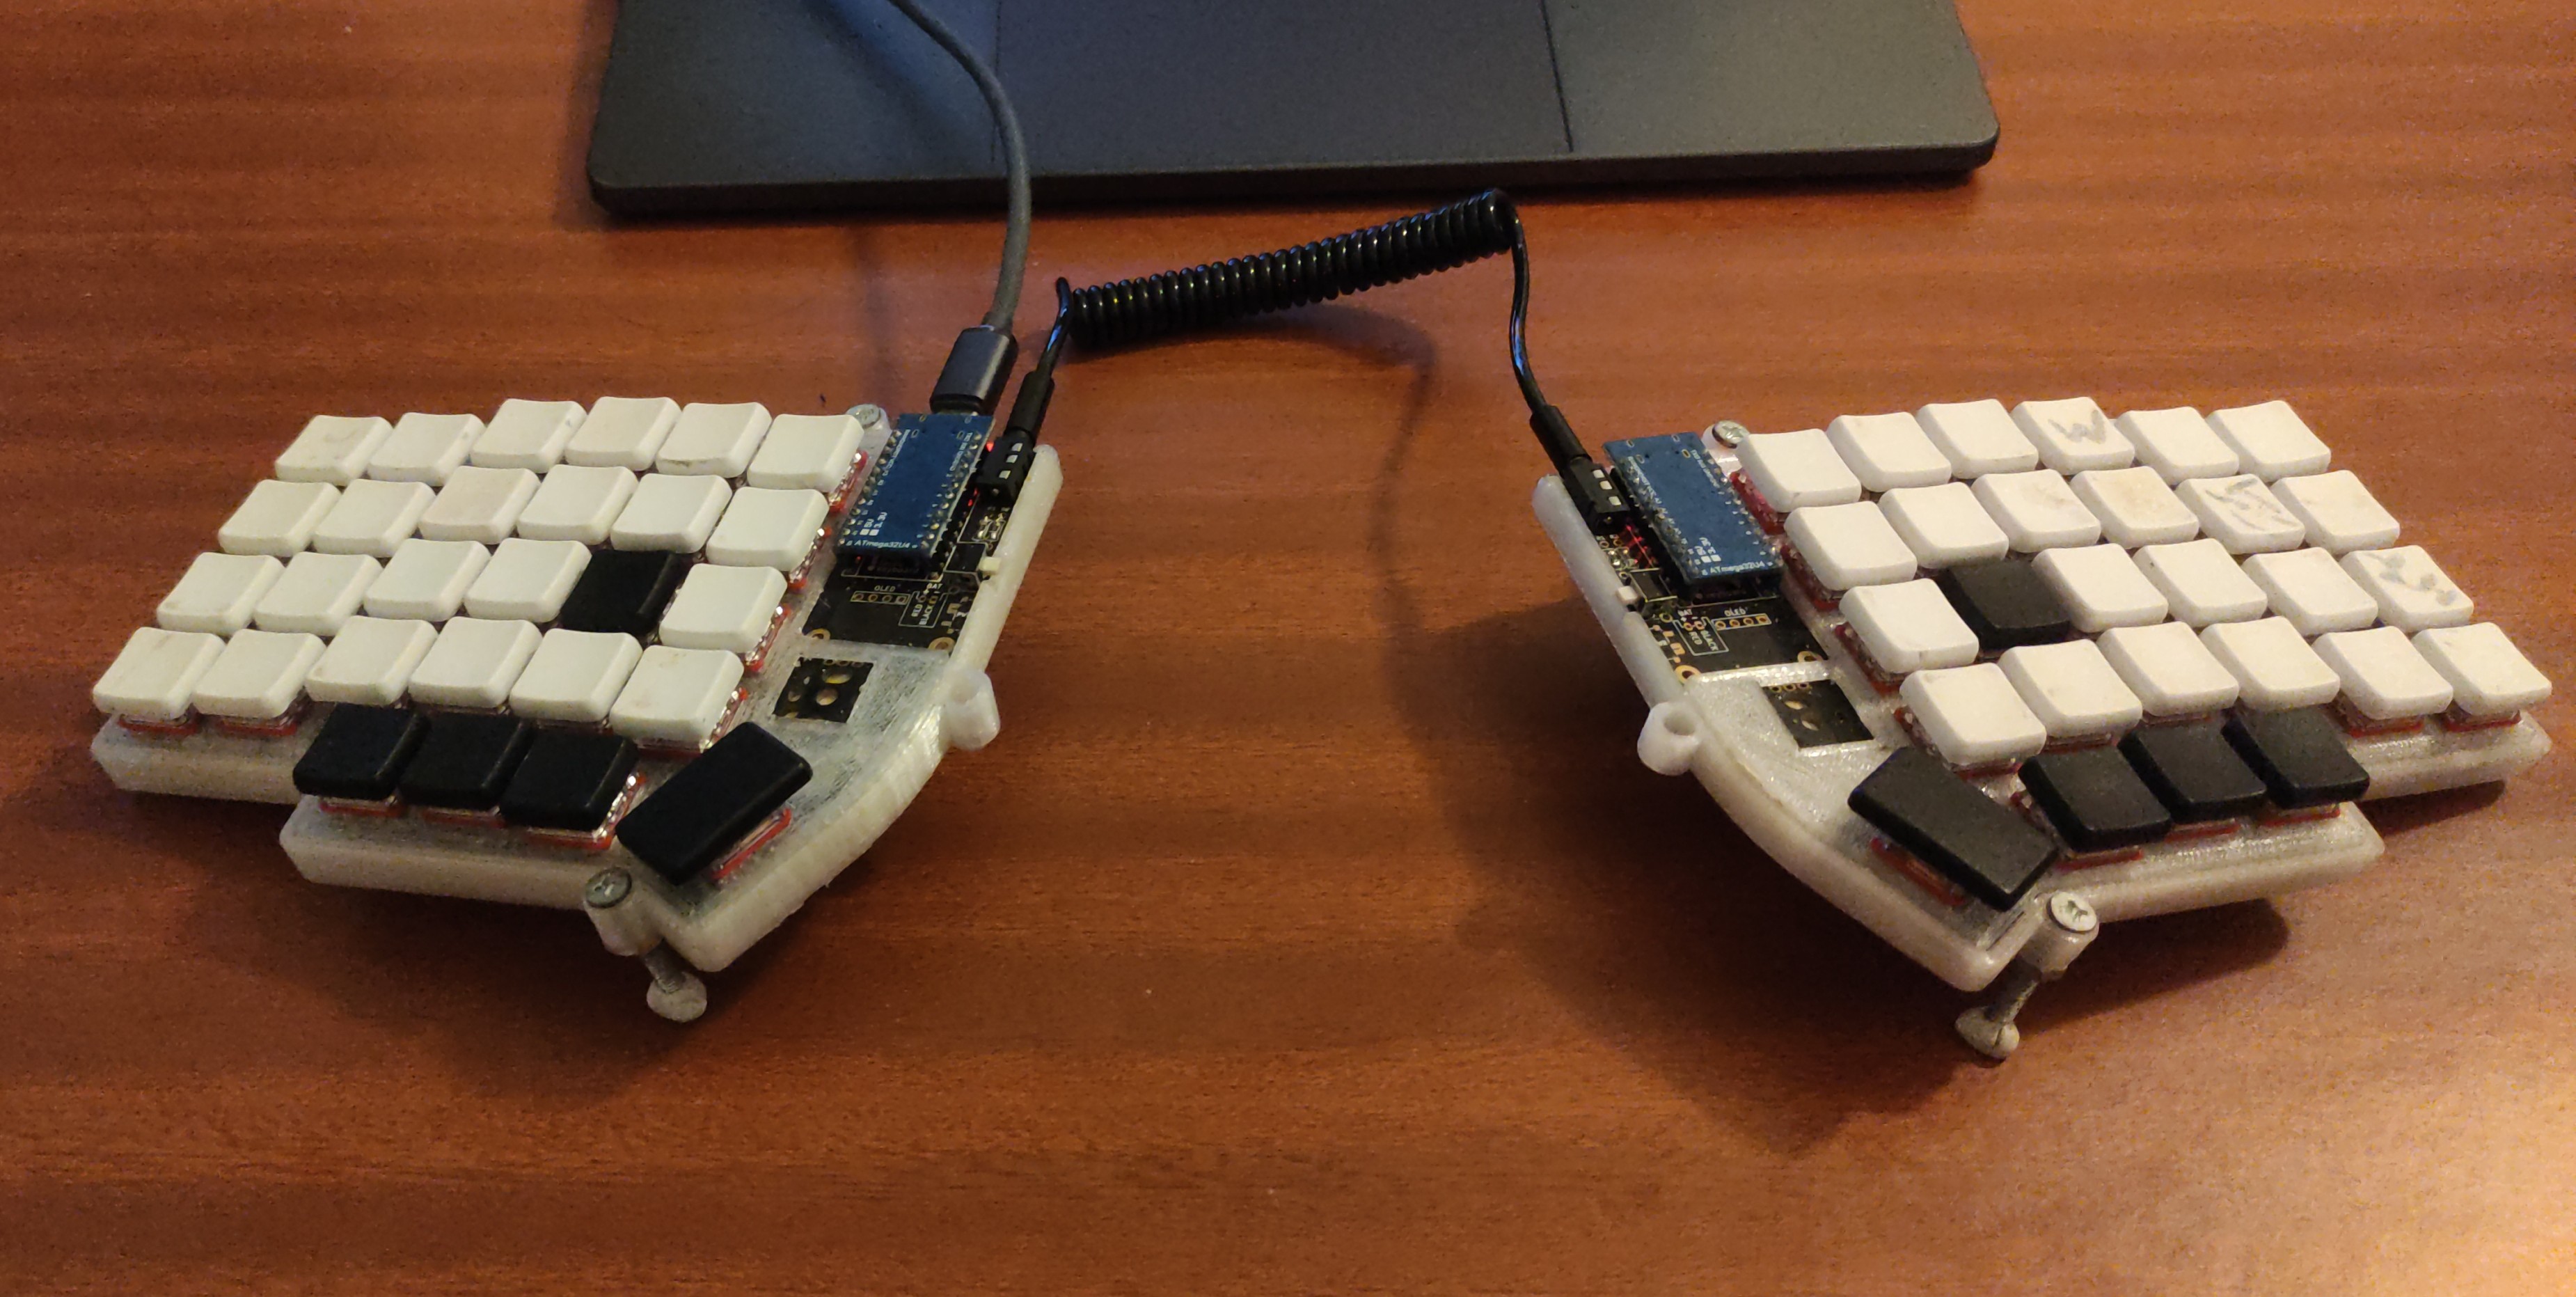
Lily58 - Final keyboard, with 3D printed tenting case.
I’m so glad it only took me 5 months to finally stop being lazy and print the case.
Thoughts after 10+ months of use
The Feels
I love this thing.
Typing on this keyboard feels buttery-smooth. I really like the feel of the low profile mechanical switches and the PBT keycaps feel very solid and provide a nice clicking sound. The column staggered layout also feels very natural and was surprisingly easy to adapt to.
The rubber Blu Tack
feet make it impervious to external side forces, i.e. it does not slide around, while keeping it easy to pick up and adjust the position. The tenting was also a very good addition, I found a small angle of about 15~20º to be my ideal.
Further, because it is split I can carry it in a small pouch and throw it in my backpack without much hassle. However, using it on the go with a laptop carries some issues.
- You need a lot of desk space to use it effectively - the laptop has to be significantly in front of the keyboard. This makes using it on small library/coffee shop desks a problem, I can really only use it at dedicated study rooms at my UNI.
- While carrying it is no big deal, there is definitely some friction when the time comes to take it out and use it. Feels like I have to perform this elaborate ritual every time I want to use it: take the pouch, open it, remove the two halves, plug in the TRS connector, plug in the USB-C cable to my laptop, find the perfect position on the table, do some work, repeat all the steps in reverse when packing. If I know I’m just going to be working for less than 20min I sometimes don’t bother with my hacker setup. Maybe I’m just lazy.
- Depending on the switches it can be fairly loud.
Because of these reasons, I would not recommend getting a split keyboard if you’re the type of person that is always on the move and does most of the work in odd / tight places along the way. That being said, if you have a dedicated work space with plenty of room this could be a very good investment!
The Layers
This keyboard really integrates perfectly into my keyboard heavy workflow. That is no doubt in great part due to layers.
I’ve talked about layers and home-row mods in my last post and I’ve carried most of those ideas into the split zone. You can check out my JSON config here and load it on the QMK configurator .
As it is, I’ve settled on 4 layers:
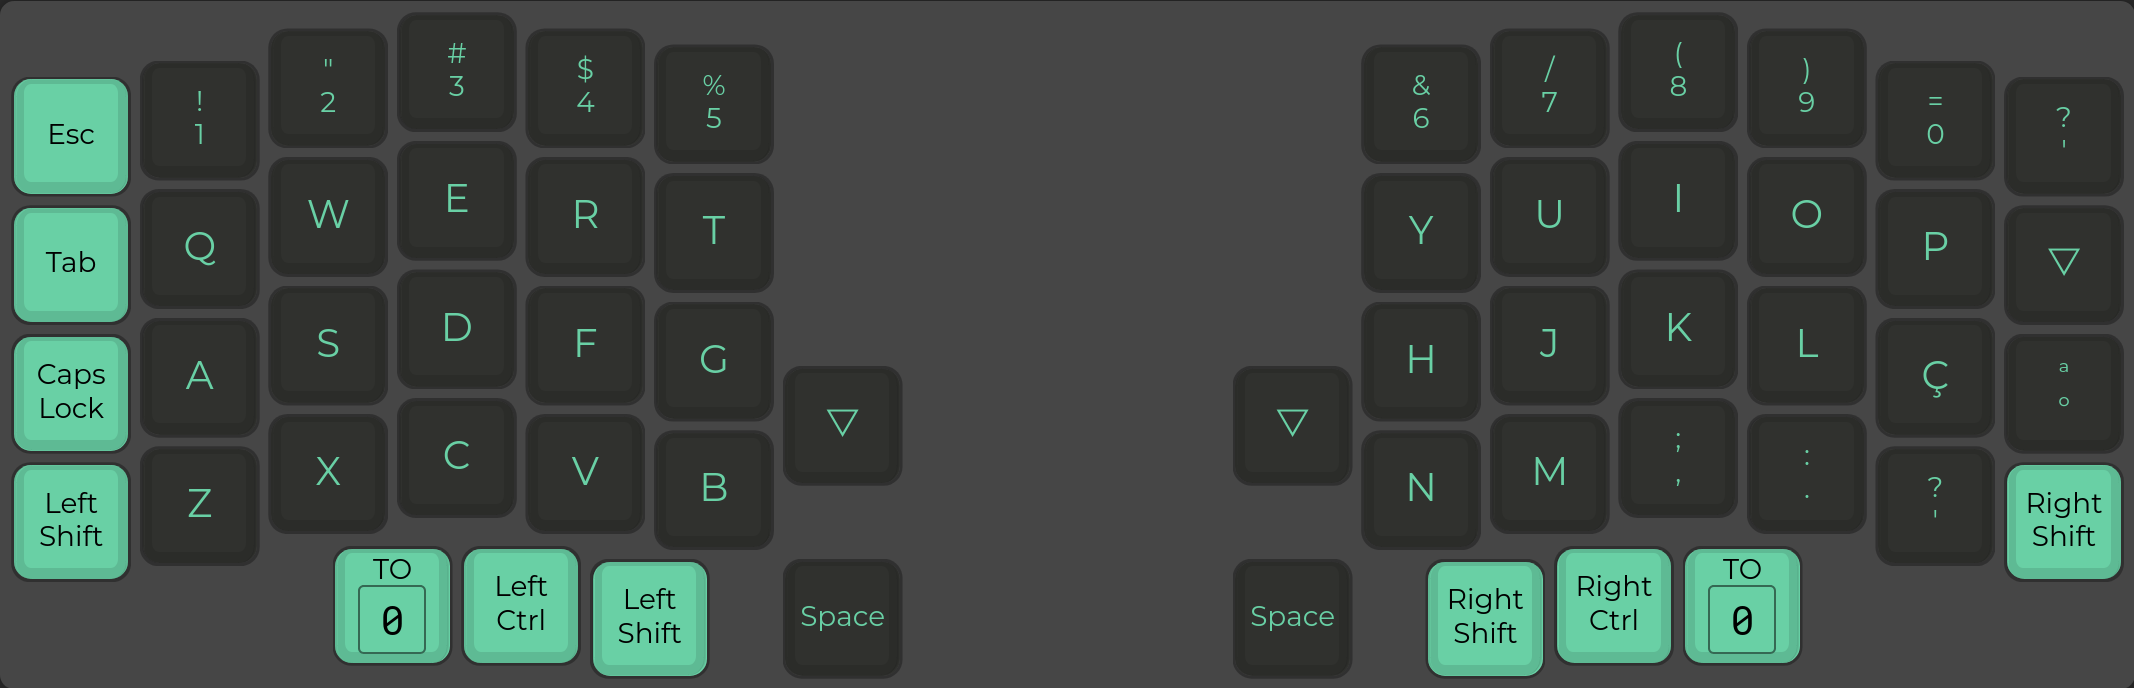
Layer 1
This is my default Colemak-DH layer. It has the home-row mods, numbers on the top row, Esc, Space, Backspace and Enter on the thumb keys.

Layer 1 - Default Colemak-DK
Layer 2
This layer is accessed by tap-holding either Esc or Enter. It has a numpad on my left hand and arrows and media controls on my right hand, with Fn keys uptop.
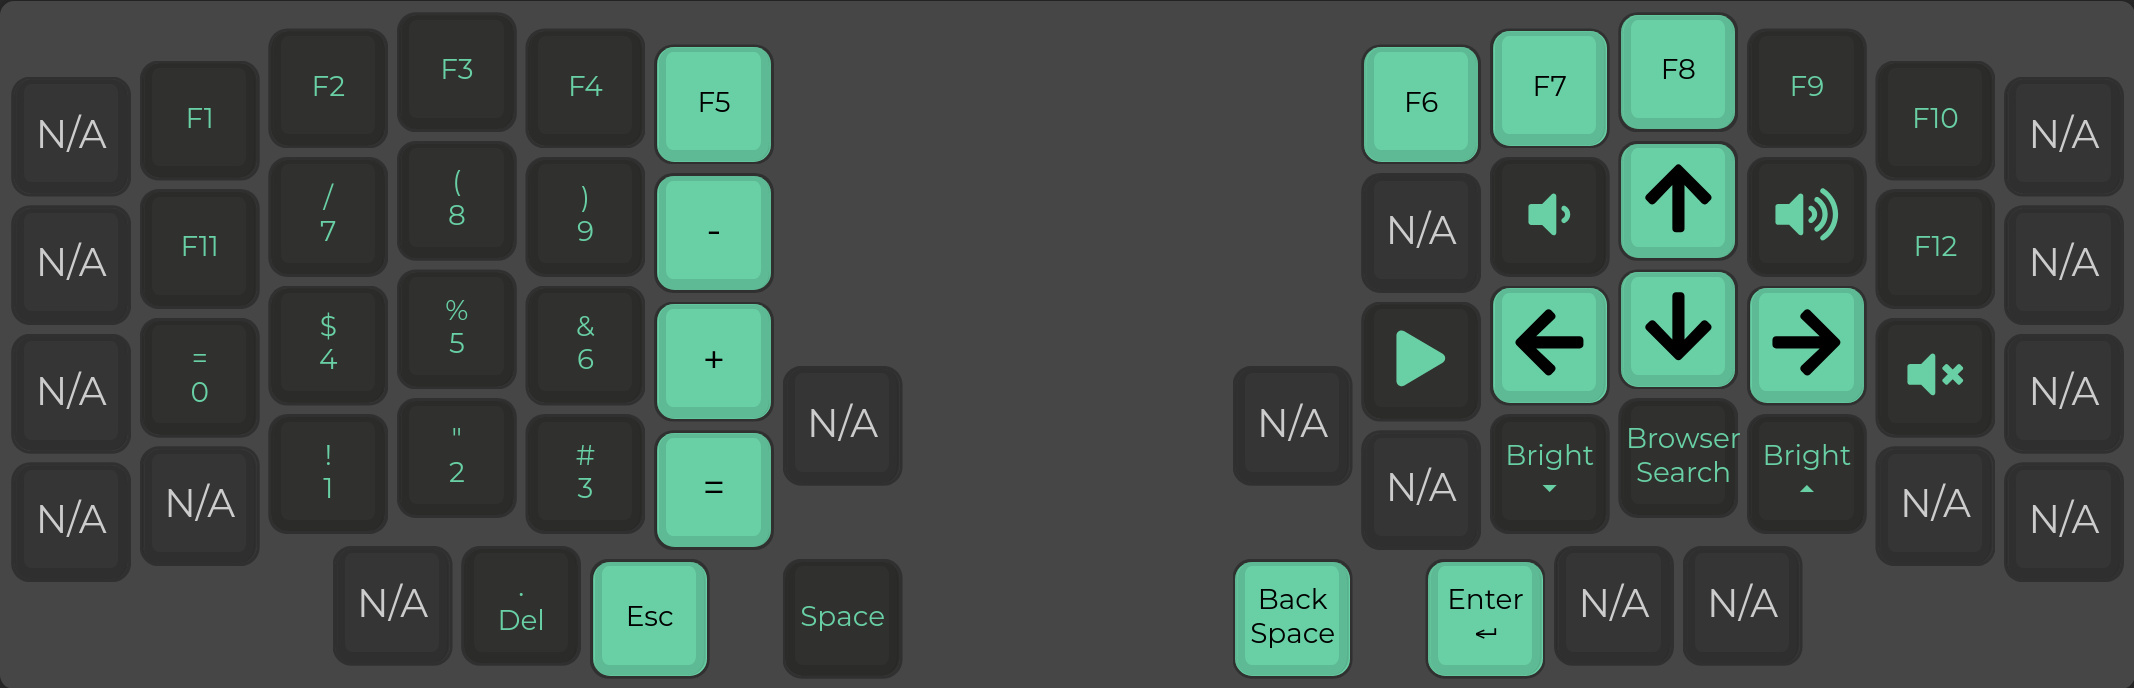
Layer 2 - Default Colemak-DK
Layer 3
This layer is accessed by tal-holding either Backspace or Space. It is my special symbols layer. I use it mostly for quick access to all the brackets () {} [] <> needed for programming on my left hand, as well as the math operation symbols on my right + - / * = % \ #.
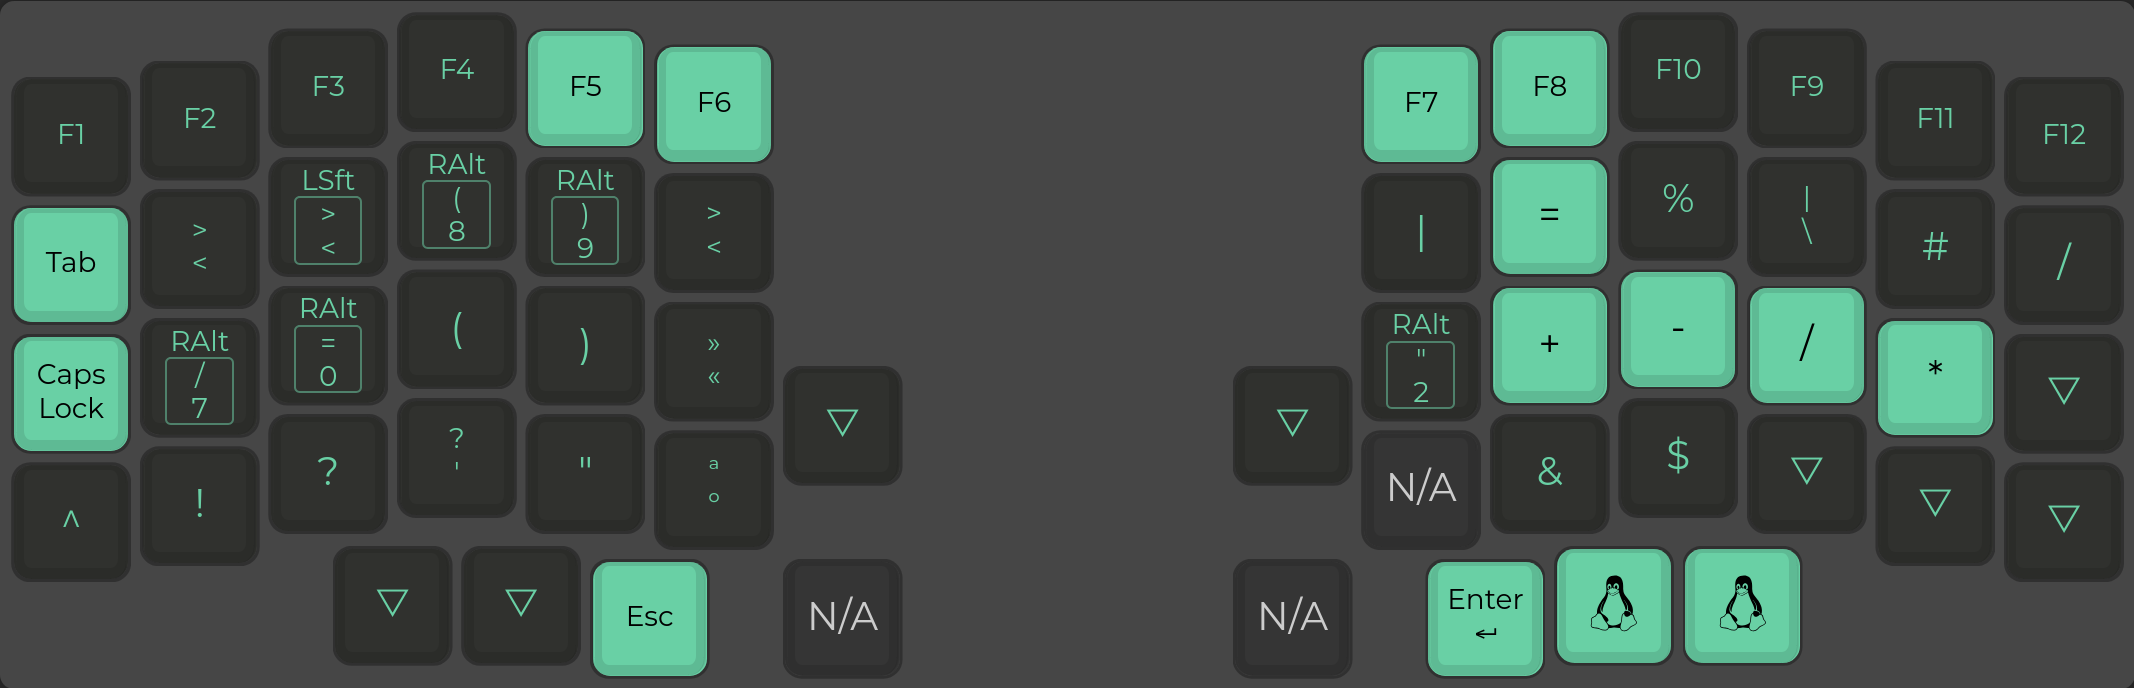
Layer 3 - Special Symbols
I had to do some shenanigans to get the [] <> and {} to work with the PT keyboard language, that’s why those look weird.
Layer 4
I can toggle into this layer by tapping the furthest thumb key. It is a QWERTY layer that I use while playing games or if a friend wants to try my keyboard.
Layer 4 - QWERTY
It took a couple of weeks to get used to this setup, but now I feel quite agile even typing numbers or special symbols. It is quite nice having dedicated layers for those.
The Looks
Definitely an unusual sight. A lot of people have asked me about it throughout my usage. Most were confused (rightly so). The reactions usually go something like this:
“What the hell is that?”
“Can you even type without the letters?”
“Can I try?”
The custom keyboard folks will also add “Meh, the feel is not my cup of tea”. Understandable.
Finally, if it’s someone over 40y they’ll inevitably ask:
“Are you planning on selling those?”
The over 40 thing was a joke but why is it that some people can not fathom having a passion project without some monetary compensation in mind? Maybe I’m just overthinking, perhaps most even come from a place of good faith and wonder if this is an innovative (it’s not), useful (debatable) product. But then, when you answer that “it’s not really a business venture” they give you the look, and if you have ever sunk time into any side project you know exactly what I’m talking about.
Feels oddly sad, I know one day I’ll find myself looking on the other side.
Okay, rant over. TLDR; It’s an interesting conversation starter, if nothing else.
Conclusion
Typing is still our primary interface with all that is digital, and digital is becoming the primary interface between us.
Therefore, in my opinion, it makes a lot of sense to really break out and explore all the options available when it comes to typing, be it software or custom hardware. If you, the reader, decide to pursue building your own split keyboard, here’s what I would do differently now:
- Source all parts individually (saves money).
- Source the PCBs from an on demand PCB manufacturer (saves money, you can even split / gift the extras to a friend).
- Get a keyboard with less keys. The number row became useless for me, around 40 would be my sweet spot.
- Print yourself a case with tenting as soon as possible.
All in all, this was an interesting project, definitely the most useful gadget I’ve built. It feels great materializing a piece of hardware that you can infinitely customize to perfectly play into your workflow.
This is not the end.
I’m curious as to where the future of digital input will lie. Perhaps I’ll find it at the bottom of the next rabbit hole.
Until then,
— José Duarte Lopes
Epilogue
It was light out. The time was such that most people were still working.
Naturally, he remained.
Sitting by himself on a dim-lit corner of the room, the strange man worked away. His weapon of choice? You can’t really tell… a keyboard of some sort? His focus was so diligent one could mistake it for some sort of trance. As it often does, it intrigues, so they approach.
“Hey, what the hell is that thing?”
Not for a second taking his eyes off the screen, he answered. Something to do with wrist pain and custom keyboards. They do not listen, for in that moment something terrible, hidden yet so blatantly out of place catches their eye.
“Why are your keycaps blank?”
I smile.
“I made them that way, for you see I have no need for them.”